No. 3.3.1
Hole Repair, Epoxy Method
OUTLINE
This method is used to repair cosmetic defects or minor damage to an unsupported
tooling or mounting hole. The hole may have component leads, wires, fasteners,
pins, terminals or other hardware run through it. This repair method uses high
strength epoxy to restore the damaged surface surrounding the hole. This method
can be used on single sided, double sided or multilayer circuit boards and
assemblies.
CAUTION
Damaged inner-layer connections may require surface wire adds.
CAUTION
Input Text
TOOLS & MATERIALS
Ball Mills
Base Board Repair Kit
Cleaner
Color Agents
Epoxy
Knife
Micro-Drill System
Mixing Sticks
Oven
Scraper
Tape, Kapton
Wipes
PROCEDURE
- Clean the area.
- Mill away the damaged board base material using the Micro-Drill and ball
mill. All damaged base board material and solder mask must be removed. No fibers
of laminate material should be exposed at the surface perimeter of the hole.
(See Figure 1).
NOTE
To clearly see that all damaged material has been removed, flood the area with
alcohol or solvent. Damaged internal fibers of the base material will show up
clearly.
- Remove all loose material and clean the area.
- Where needed, apply Kapton tape to protect exposed parts of the circuit
board. Tape may be required inside the hole. If epoxy reduces the inside
diameter, the hole may have to be redrilled after the epoxy has cured.
NOTE
The circuit board may be preheated prior to filling the area with epoxy. A preheated
PC Board will allow the epoxy to easily flow and level out. Epoxy applied to an
unheated circuit board may settle below the circuit board surface as the epoxy cures.
CAUTION
Some components may be sensitive to high temperatures.
- Mix the epoxy. If desired, add color agent to the mixed epoxy to match the
PC board color.
- Coat the area with epoxy up to and flush with the circuit board surface. A mixing
stick may be used to apply and spread the epoxy. (See Figure 2).
NOTE
A slight overfill of epoxy may be desired to allow for shrinkage when epoxy
cures.
- Cure the epoxy per Procedure 2.7 Epoxy Mixing and Handling
- After the epoxy has cured, remove the tape.
- If needed, use a knife or scraper and scrape off any excess
epoxy. Scrape until the new epoxy surface is level with the surrounding circuit board
surface.
NOTE
Apply surface coating to match prior coating as required.
- Remove all loose material. Clean the area.
EVALUATION
- Visual examination for texture and color match.
- Hole size measurement to specification
- Electrical tests to conductors around the repaired area as applicable.
|
|
|
Solutions Across the Board
TM
|
|
|
|
Product Class: R/W
Skill Level: Advanced
Conformance Level: High
Revision: D
Revision Date: Jul 7, 2000
Repair Service Charge

Damaged Hole, Non Plated

Figure 1: Mill away damaged material with the Micro-Drill and ball mill.

Figure 2: Apply epoxy with a mixing stick sharpened at one end.
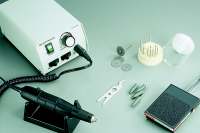
Figure 4: Micro-Drill
System.
|
|
|

